Search Manual
Band-in-a-Box® 2021 for Windows® User's Guide
Chapter 8: Notation and Printing
Band-in-a-Box offers a variety of notation and printing features, both for viewing parts on-screen as they play and for printing them as sheet music.
|
To view the notation, open the Notation window by pressing the notation button on the main screen. Close the window by pressing this button again. |

Band-in-a-Box Notation screen displaying the melody track in Standard Notation mode
Band-in-a-Box offers multiple modes of notation for different purposes. The notation defaults to Standard Notation mode; other modes are selected with buttons on the Notation window toolbar.
![]() Standard Notation Mode to display or print Notation and enter lyrics. The grand piano staff and/or guitar tablature with notes, chord symbols, and lyrics.
Standard Notation Mode to display or print Notation and enter lyrics. The grand piano staff and/or guitar tablature with notes, chord symbols, and lyrics.
![]() Editable Notation Mode to enter or edit notation. A special staff with time divisions for mouse-based editing.
Editable Notation Mode to enter or edit notation. A special staff with time divisions for mouse-based editing.
![]() Staff Roll Notation Mode to enter or edit notes, velocity, and duration. The note heads are shown with editable velocity and duration lines.
Staff Roll Notation Mode to enter or edit notes, velocity, and duration. The note heads are shown with editable velocity and duration lines.
![]() Lead Sheet notation to display or print notation as full arrangements or in fake sheet style. This is a full screen notation window with notes, chord symbols, and lyrics.
Lead Sheet notation to display or print notation as full arrangements or in fake sheet style. This is a full screen notation window with notes, chord symbols, and lyrics.
Exploring the Notation Window
![]()
With the Notation window open, the toolbar at the top of the window gives you access to its many features and options.
![]() Opens the Notation Window Options dialog.
Opens the Notation Window Options dialog.
![]() Press to launch the Lead Sheet window.
Press to launch the Lead Sheet window.
![]() Press this button to print the notation to any printer supported by your Windows® system.
Press this button to print the notation to any printer supported by your Windows® system.
![]() 3-stage buttons to select a Notation window mode - Standard Notation, Editable Notation, or Staff Roll mode.
3-stage buttons to select a Notation window mode - Standard Notation, Editable Notation, or Staff Roll mode.
![]() This box displays the name of the note that will be inserted when you click the mouse.
This box displays the name of the note that will be inserted when you click the mouse.
![]() These determine whether a Note or a Rest will be inserted when the mouse is clicked.
These determine whether a Note or a Rest will be inserted when the mouse is clicked.
![]() When this is selected, the notation is entered as monophonic (one note only) to avoid extra notes in a single note melody line.
When this is selected, the notation is entered as monophonic (one note only) to avoid extra notes in a single note melody line.
![]() The Clean Notation Mode cleans up the notation by eliminating display of redundant grace notes and glitches for easier reading.
The Clean Notation Mode cleans up the notation by eliminating display of redundant grace notes and glitches for easier reading.
![]() Notation supports various time signatures (4/4, 3/4, 2/4, 2/2, 12/8, 9/8, and 6/8). Press this button to select one of the time signatures from the list.
Notation supports various time signatures (4/4, 3/4, 2/4, 2/2, 12/8, 9/8, and 6/8). Press this button to select one of the time signatures from the list.
![]() This button allows you to visually transpose the notation.
This button allows you to visually transpose the notation.
![]() Click on the button to select a track to display, or hover the mouse cursor over it and use the mouse wheel to quickly switch tracks.
Click on the button to select a track to display, or hover the mouse cursor over it and use the mouse wheel to quickly switch tracks.
![]() You can edit events including all MIDI events and lyric events using the Event List Editor .
You can edit events including all MIDI events and lyric events using the Event List Editor .
![]() To enter note-based lyrics press the Lyrics button on the Notation toolbar.
To enter note-based lyrics press the Lyrics button on the Notation toolbar.
![]()
![]() The zoom buttons make it easy to increase or decrease the font size of the notation. Holding down the [Ctrl] key and pressing these buttons results in finest possible incremental adjustment in size.
The zoom buttons make it easy to increase or decrease the font size of the notation. Holding down the [Ctrl] key and pressing these buttons results in finest possible incremental adjustment in size.
![]() Add or edit Section Text on the Notation.
Add or edit Section Text on the Notation.
![]() When this button is pressed, you can drag the mouse over notes to hear them.
When this button is pressed, you can drag the mouse over notes to hear them.
![]() This will generate a vocal track using an online third party vocal synthesizer called Sinsy for a MIDI melody track with lyrics.
This will generate a vocal track using an online third party vocal synthesizer called Sinsy for a MIDI melody track with lyrics.
![]() This will launch an internet browser and show a video about Notation window.
This will launch an internet browser and show a video about Notation window.
![]() This allows you to quickly change the number of bars per line.
This allows you to quickly change the number of bars per line.
![]() This will display notation with larger font size and note names within note heads. Press the button again to return to the normal size.
This will display notation with larger font size and note names within note heads. Press the button again to return to the normal size.
![]() While a song is playing, click on this button and the song will loop the bars shown on the notation screen.
While a song is playing, click on this button and the song will loop the bars shown on the notation screen.
The Notation window displays an improved system of Bar Lyrics, Section Text, and Bar Settings, and additional chord mode (Roman Numeral, Nashville Notation, etc.) above the Standard chord symbols.
![]() Click on the [Chord Display] button on the toolbar, go to Layers, and make a selection.
Click on the [Chord Display] button on the toolbar, go to Layers, and make a selection.
Drum Notation Support
Play a MIDI Drums and open the Notation window. Then, select the Drums track and you will see drum notation.

|
In the clef area, you see a guide telling you what drum notes are used in that line of notation (e.g. Kick, Snare, HiHat). |
For the Melody or Soloist track, you need to set the track type to “Drums” either in the Notation Window Options dialog or with the menu Melody (or Soloist) | Track Type.
Chord Step Advance
Use the Ins and Del keys on the numeric keypad to step advance on any track by one chord. The track MIDI data can display on the on piano, guitar, lead sheet, drums, and notation window(s).
This feature advances the current track and displays the next group of notes on that track. For example, if the current track is set to the Melody track, pressing the chord advance buttons will display the next note or chord of the melody. The Chord Advance feature is a great way to study the notes being played, and to navigate around the track.
Standard Notation Mode

This mode displays the notation for any individual track, and allows the entry of chords and lyrics. Features include:
- Notation display for the Bass, Drums, Guitar, Piano, Strings, Melody, or Soloist track.
- Optional display of guitar chord diagrams.
- As the song plays, the notes that are sounding are highlighted in red. This helps with sight reading or following the music.
- You can set the notation to scroll either 1 or 2 bars ahead of the music without interfering with your view of the current notation.
- Handles Jazz eighth notes and triplet figures correctly.
- Double-clicking on the window or pressing the space bar plays the song from the current time location.
- Automatic options such as auto durations, clean notation, mono display, minimize rests, hard rests, and engraver spacing produce very musical and readable notation.
- Beamed notes are automatically given slanted beams.
- Groups of 5 notes will automatically display as groups of 3+2 or 2+3, or can be set this way manually. If you’d prefer to see them as a group of 5 notes, you can right mouse click on the time line, and set the resolution to 5 for that beat.
Right-click menu for Standard Notation
This menu opens with a right mouse button click in the Standard Notation window.
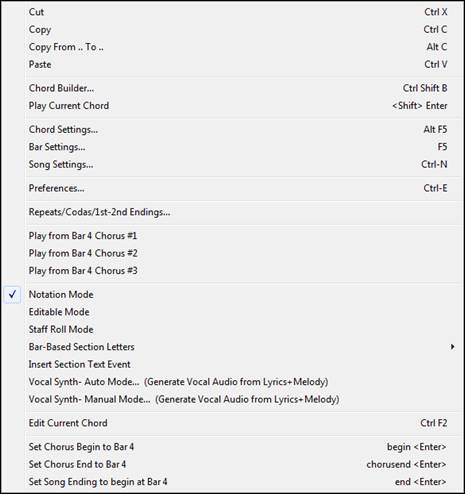
Use this menu to access major editing features and dialogs. You can change to another notation mode by selecting it in the list.
Keystroke Commands
- To change between notation views, press Ctrl+Alt+N.
- To open the Print Options dialog, press Ctrl+P.
- To enable the screen loop, press 1 on your numeric keypad.
- To jump one screen ahead, press the DOWN arrow key.
- To step one screen back, press the UP arrow key.
Visual Transpose
This feature displays the chords and notation for non-concert key instruments like trumpet and saxophone in the non-concert key (Bb, Eb) while the music plays in concert key.
| Note: This does not transpose the music. To do that, use the song key box to the right of the Style area. |
|
![]() Pressing the [Chord Display] menu button opens a list of concert and non-concert instruments.
Pressing the [Chord Display] menu button opens a list of concert and non-concert instruments.
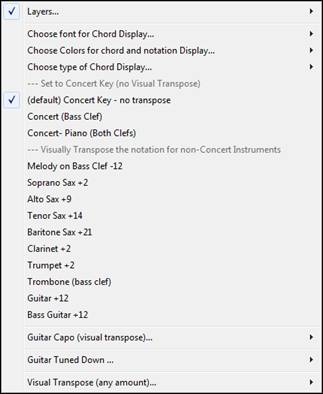
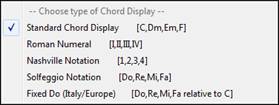
The type of chord display can be selected from the Choose type of Chord Display submenu.
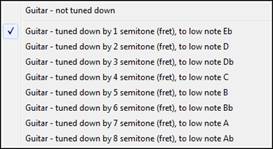
There are also settings for guitar capo, tuning the guitar down, and visual transpose of any number of semitones.
Guitar Settings
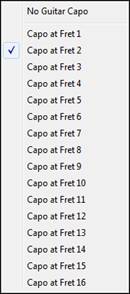
![]() For example, with “Capo at Fret 2” selected, if you enter a D chord it will play as an E chord but display as a D chord. This is also true for notes entered in notation. An alert shows on-screen.
For example, with “Capo at Fret 2” selected, if you enter a D chord it will play as an E chord but display as a D chord. This is also true for notes entered in notation. An alert shows on-screen.

You can also tune the guitar down from 1 semitone to 8 semitones. If you tune down by 1 semitone a song entered in E will display in E but play in Eb.
Editable Notation Mode
![]() Enter the Editable Notation mode from the notation screen with a single mouse click on the Editable Notation button.
Enter the Editable Notation mode from the notation screen with a single mouse click on the Editable Notation button.
In the Editable Notation mode, the time line is more visible as it shows with a thick yellow vertical line. You can play the song from the current location by pressing the space bar or double-clicking on the time line.
You can enter, move, and edit notes and rests using standard mouse techniques – point and click, drag and drop, and right-click to open the Note Edit dialog.

This is the screen for step-entry of a melody or for editing existing parts. Notice the grid of vertical lines, which sub-divide each beat. These lines indicate where the notes will be placed according to the resolution of the song.
 |
When mousing over notes in this window, summary information about the note is displayed (pitch/channel/velocity/duration). |
![]() To enable this feature, click on the [More..] button in the Notation Window Options dialog to open the Other Notation Options dialog. Then select the “Show Popup Hint for Note Properties” checkbox.
To enable this feature, click on the [More..] button in the Notation Window Options dialog to open the Other Notation Options dialog. Then select the “Show Popup Hint for Note Properties” checkbox.
![]()
Easy Method of Guitar Tab Entry
Click on the string (on the tab), then click on the note (on notation, or on-screen guitar) to get it entered on that string/fret. To access this feature, for melody (or soloist) track, first set menu Melody | Track Type to Guitar. Then open the Notation window and choose editable notation. You will now see Guitar Tab below the Treble Clef. You can now highlight a note, using Shift+Arrow Right (or Left). When a note is highlighted in red, you can click on the tab on the string that you would like the note played on. This will change the note to that string, and the tab will be updated to reflect this.
For Editable Notation with Guitar Tab, you can easily change the string for a note, by dragging the note from one tab string to another.
![]() Select the Melody track in the Notation window.
Select the Melody track in the Notation window.
![]() Enter the Editable Notation.
Enter the Editable Notation.
And set the track type to Guitar (via main menu Melody - Track Type = Guitar).

Now you have Editable Notation and tab. After you insert notes on the notation, you can drag notes from one tab string to another to change the channel and fret position that plays on the guitar.
For example, here you can drag the “1” down a string to have the middle C note played on the third string instead of the second. |
|
Resolution
The above example is in Jazz Swing style so Band-in-a-Box has automatically set the grid resolution to 3 per beat (triplets). This resolution can be changed in the Notation Options dialog, but the program automatically sets the resolution to the correct value based upon the Band-in-a-Box style that is in use.
- Swing styles use 3 lines to divide each beat into eighth note swing triplets.
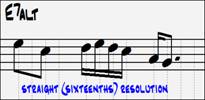
- Straight styles use 4 lines to divide each beat into sixteenth notes.
 |
 |
Beat Resolution
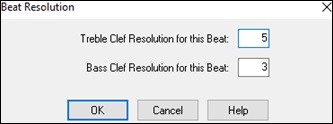
The user can manually set the resolution for any beat in the Beat Resolution dialog, which opens with a right-click on the time line. You can also open this dialog by right-clicking on the window and selecting Change Beat Resolution from menu.
 |
|
Setting the “Treble Clef Resolution for this Beat” to 5 allows a group of five notes to be placed on one beat. |
 |
Entering Notes
To insert a new note on the staff move the mouse to the location that you want. If you want beat 1, move to the first dotted line in the bar. Click on the staff over the note that you want.
Confirmation dialogs show warnings to prevent accidental entry of a duplicate note (same pitch near same time) and of a very high or very low note (large # of ledger lines).
![]() The Current Note box in the toolbar will give you the name of the note that you’re on.
The Current Note box in the toolbar will give you the name of the note that you’re on.
Click with the left mouse button to insert the note:
- To insert a sharp: Hold down the Shift key as you click the note.
- To insert a flat: Hold down the Ctrl key as you click the note.
- To insert a natural: Hold down the Alt key as you click the note.
|
Brackets (#) are drawn around accidentals after a bar line as a courtesy, where no accidental is required. |
How is the length of the notes determined?
Band-in-a-Box uses an intelligent auto-duration feature to determine how long the note should be. Auto-durations mean that you can enter a lead sheet style melody by just clicking once per note, dramatically speeding up the entry of notation.
Any note that is entered will initially have a duration of 2 bars (2 whole notes). When the next note is put in 2 beats later, Band-in-a-Box will adjust the duration of the previous note to just shorter than 2 beats. This means that you don’t have to worry about durations at all and can simply point and click to enter the notes where you want them. If you want to override the auto duration, you can edit the note using the right mouse key, which will permit you to type the exact duration that you want.
Entering Notes Entirely with Keystrokes
There’s a keystroke entry mode - the “N” mode, which lets you enter a melody entirely using keystrokes. The keystrokes are N to enter a note, up/down cursor to change its pitch, M to enter an additional note a third above the existing note, left/right cursor to move the time line, and R to enter a rest.
|
Hit the N key to enter a note at the current time line. |
|
While the note is highlighted, use the up/down cursor keys to change its pitch. |
|
If you want to add a note a third above the existing note on the current time line, hit the M key. |
|
Use the right/left cursor keys to move the time line. |
|
Hit the R key to enter a rest at the current time line. |
Entering Drum Notes
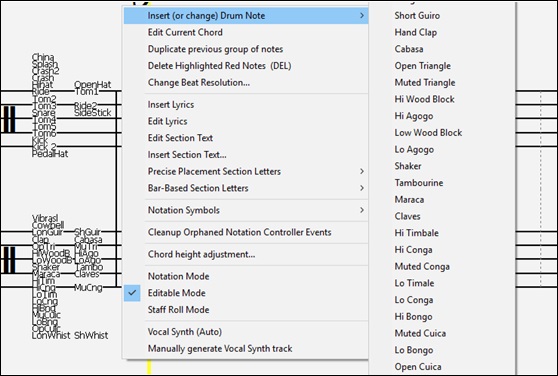
You can enter drum notes to the Drums track or the Melodist/Soloist track with the track type set to Drums. Right-click on the window, and use the Insert (or change) Drum Note menu item. For drum notes shown on the left in the drum guide (e.g. China, Splash, Crash2, etc.), you can click on the corresponding vertical position of a drum note you want.
Entering Rests
Insert a rest by holding the back-quote key (tilde key without pressing Shift) then clicking on the Notation window. Another way to enter a rest is to click the Rest checkbox and then point and click where you want the rest to appear. This automatically shortens the duration of the previous note.
Forced Rests (Hard Rests)
This allows you to insert a rest in the notation, which will be in effect even if you have Minimize Rests set to false. For example, we are able to display a 16th note rest even though the Minimize Rests feature is on. To do this, click on the [Rest] button and then click on the notation at the location that you’d like a 16th note rest. The Hard Rest will show up in blue in the editable notation window and can be removed by holding the [DEL] key and clicking on the rest.
Moving a note in time
If you want to change the start time of a note, drag the note with the left mouse button to the new location. This is a simple way to move the note. Alternatively, you could edit the note numerically with the right mouse button.
Changing the pitch of a note
Similarly, you can drag the note vertically to change the note value and release it when you’re on the note you want. Hold down the Shift, Ctrl, or Alt key to have the note inserted as a sharp, flat, or natural respectively.
Insert Bends in Notation
In the Editable Notation window, any note can be made into a bend by right-clicking on the note and changing its type to “Guitar Bend” with the Edit Note command.
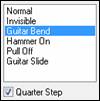 |
The “Quarter Step” option will make a bend displayed as a quarter step below the target note. |
Right-click Editable Notation menu
A right-click of the mouse in the Editable Notation window will open this menu.
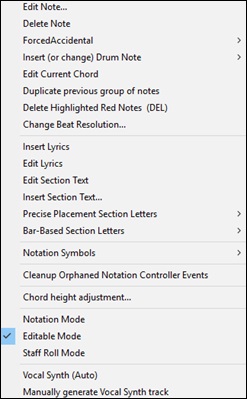
Edit Note opens the Note dialog and lets you edit the current note.
Delete Note deletes the current note.
Forced Accidental lets you quickly add an accidental to the current note.
Insert (or change) Drum Note enters a drum note. (Note: This menu item will appear for Drums track or Melody/Soloist track with the track type set to Drums.
Edit Current Chord This opens a text box with the name of the chord at the current location. Type in any changes and press Enter or Tab to return to the Editable Notation window.
Duplicate previous groups of notes quickly duplicates the previous chord (a group of notes on the same location) without having to reenter it.
Change Beat Resolution allows you to change the beat resolution of the current beat.
Delete Highlighted Red Notes deletes all notes that are currently highlighted in red.
Insert Lyrics allows you to enter note-based lyrics.
Edit Lyrics opens the lyrics event list editor.
Edit Section Text opens the Text Events list where section text can be inserted, edited, or deleted.
Insert Section Text opens the Section Text Event dialog where either regular or boxed section text is entered along with its time and vertical position in the window.
Precise Placement Section Letters - Select a letter or number from the list and it will be inserted at the current location of the time line bar. Use this same item to remove section letters/numbers.
Bar-Based Section Letters - Select a letter or number from the list and it will be inserted at the top of the bar line so that it doesn’t overwrite chords or notes.
Notation Symbols - The notation symbols are entered from the Notation Event dialog, which is accessed from the right-click menu in the Editable Notation window. This dialog lets you insert (or remove) notation symbols such as,
Slur |
|
Accent |
|
Crescendo |
|
Legato |
|
Decrescendo |
|
Marcato |
|
Staccato |
|
Staccatissimo |
|
Select a notation symbol from those listed and the Notation Event dialog will open. In this dialog, you can further define the event and its precise location, then press [OK - Insert Event] to insert it into the notation. Use the [OK - Remove Event] to delete an existing event that is no longer needed.
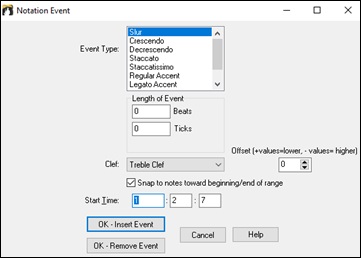
The Event Type list box lets you choose the event type (slur, decrescendo, etc.).
The Length of Event field determines the length of a slur, crescendo, or decrescendo. The length is specified in beats and ticks. If an event is a “single-peg” event, such as a staccato or accent, then this field will cause multiple events to be inserted if the range is greater than zero (and the range spans multiple pegs). If you had highlighted an area of the Notation window prior to right-clicking on it (to launch the pop-up menu and choose the notation symbols menu item) then this field is set based on the length of the highlighted area.
(Note: The highlighted area does not actually include the very last peg at the very edge of the highlighted area.)
The Clef field, if present, indicates the clef in which the event will be inserted (or removed from). Most events affect only one clef at a time, and therefore you must choose the clef and this field will be preset based on where you had initially right-clicked with the mouse on the Notation window (you did this to get the pop-up menu that launches this dialog). For example, if you had right-clicked on the treble clef, then this will be set to treble.
When Snap to notes toward beginning / end of range is enabled slurs, crescendos, and decrescendos will be based on notes that exist at the beginning and end of the specified range.
The Offset field, if present, lets you adjust make adjustments to the vertical position of an event, e.g. slurs or chord height.
The Start Time field is the start time of the event (in Measures:Bytes:Ticks).
[OK - Insert Event] exits this dialog and then inserts the event into the notation track.
[OK - Remove Event] exits this dialog and then REMOVES the event (if it exists in the specified time range) from the notation track.
Cleanup Orphaned Notation Controller Events - This command will remove notation symbol events (such as staccato) that are no longer close enough to a note to display properly.
Chord height adjustment - Use this to adjust the height of a certain chord by adjusting the “Offset:” value in the N otation Event dialog. Note that a positive value moves the chord symbol lower, and vice versa.
Modes - Clicking on another notation mode will change to that screen while staying at the same location in the song.
Vocal Synth (Auto) - Your Melody or Soloist track with lyrics can be rendered to a vocal audio track by sending it to the 3rd party vocal synthesizer Sinsy. With the “Auto” command, your song will be sent automatically to the song server and returned as an audio file on the Audio track. This may take a few minutes. When the vocal synth has been generated, the Import Audio File dialog opens. Press [OK] to import it to the Audio track.
Manually generate Vocal Synth track - With this command, Band-in-a-Box will generate a file named Sound.XML and save it in C:\bb\Data\SRequest. Use your browser to navigate to www.sinsy.jp and upload the xml file. A file named sound.wav will be returned and loaded into the Audio track of your song.
Editing Note Values
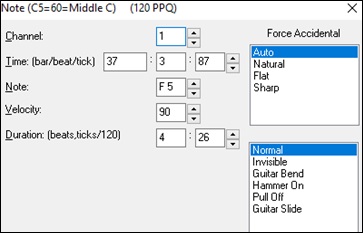
Right-click on a note. This brings up a variation of the right-click window with added commands for editing or deleting notes. Click on Edit Note to launch the Note dialog.
In the Note dialog, you can manually change the characteristics of a note by entering the exact values you wish for any given note. For example, you can change the velocity and duration by increments of 1 tick, as well as the note’s pitch and relative positioning in the bar.
|
There are spin buttons in the note attributes window. Holding the spin increments continuously, and Shift-clicking (or right-clicking) increments by a higher amount. |
Shift+clicking on the spin buttons changes:
- The pitch of a note by an octave instead of a semitone.
- The velocity, duration, or time stamp by 5 instead of 1.
For example, to change the octave of a note, Shift-click (or right-click) on the spin arrows.
Click on Delete Note in the right-click menu to remove the selected note from the Notation.
Select a region of notation to edit
To select a region of the notation you can Shift+click on the end point to easily select a large area.
- Select a small region by dragging the mouse.*
- Enlarge the region by Shift-clicking on the end point.
Force Accidental - If a note is being displayed as a sharp, but you want it to appear as a flat (or vice versa), you can force that here. Notes like Fb, Cb, E#, B# can be entered. To do this, right-click on a note (like F), and set the forced accidental to #, and the note will appear as E#.
Note Type - You can choose for the note to be Normal, Invisible (note will sound but will not appear in regular notation), Guitar Bend (a B will appear above the note), Hammer-On, Pull-Off, or Guitar Slide. Note that the guitar bend is for notation only and does not affect the sound of the note.
Keystroke Note Editing
You can easily edit notes using only keystrokes. By stepping through the notes one-by-one, when a note is highlighted you can change the pitch using the cursor keys, and other values (timing, duration, channel) with other hot keys. This speeds up editing of notes. To use this function, you do the following:
- Press Ctrl+W to open the Notation window and Ctrl+Alt+N to switch to the Editable or Staff Roll mode.
- Move to the note that you want to edit with the Shift+Arrow Right/Left keys. This will highlight the current note. Note that if you want to highlight the current chord (a group of notes), press the Ctrl+Arrow Right/Left keys instead).
- With the note highlighted in red, use the Arrow Up/Down keys to change the pitch of the note. You will hear the pitch change as the note changes.
- Use the Arrow Left/Right keys to change the note’s start time, duration, channel, or velocity (depending on the setting of the “Right/Left Cursor Edits” field in the Notation Window Options dialog.
- Press the Esc key or [Stop] button when you’re done.
Section Text for Notation
![]() You can add custom Section Text and Boxed Text messages at any position in the notation track, with optional box to appear around the text.
You can add custom Section Text and Boxed Text messages at any position in the notation track, with optional box to appear around the text.
To put a section text comment on the notation track:
![]()
![]() Open the Notation window, and switch to the Editable Notation mode.
Open the Notation window, and switch to the Editable Notation mode.
Right-click on the track at the point that you want to enter the section text. Then, select Insert Section Text from the menu.
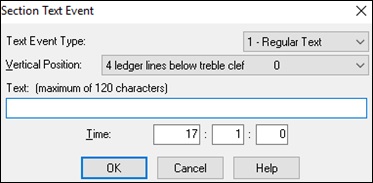
Easy Entry of Section Text on Notation Window
Typing a backslash “\” followed by any text puts that text at the beginning of the current bar as a boxed section text message. For example, \Hello would put “Hello” in a boxed section text event.
Typing \ launches the edit dialog for the section text.
![]()
Type the section text that you want, such as “Guitar Solo,” and then press Enter.

This text can be entered once per bar. You can use this for section headings, or even to enter lyrics bar by bar.
Staff Roll Notation Mode
![]() Click on the Staff Roll notation mode button to enter the Staff Roll mode.
Click on the Staff Roll notation mode button to enter the Staff Roll mode.

This mode is similar to the Editable Notation Mode, except that the beats begin right on the bar line. You can see the duration of the note visually represented by a horizontal blue line and the note’s velocity displayed as a vertical blue line.
Using the Mouse to Edit Velocity and Duration
There is an additional function available in this mode: right mouse drag. Place the mouse cursor on the note head and hold down the right-mouse button. Then, starting at the note head, drag the cursor horizontally to set the note’s duration, or drag it vertically to set the note’s velocity.

Piano Roll Window
|
For advanced editing of notes plus graphic controller editing, go to the Piano Roll window, either by selecting the Piano Roll button on the toolbar, or the Window | Piano Roll Window menu item. |
Notation Window Options
![]() Press the [Opt.] button in the Notation window to opens the Notation Window Options dialog.
Press the [Opt.] button in the Notation window to opens the Notation Window Options dialog.
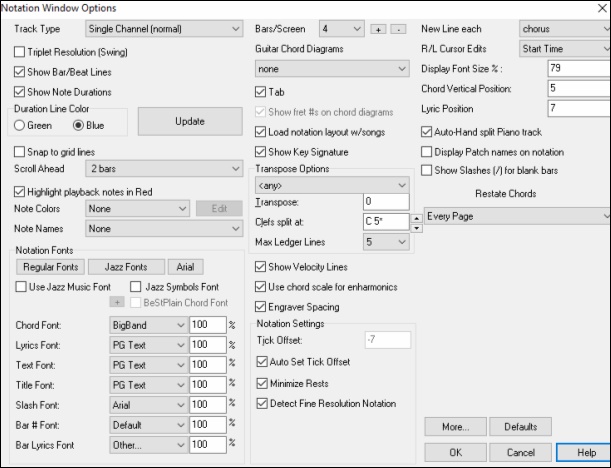
Track Type:
You can set the track type to use for the Melody or Soloist track. Normally you’dleave the track type set to Single Channel, but you can also set it to other types.
Multi (16)-Channel: All MIDI channel assignments are preserved and output on playback. This would be useful for importing an entire MIDI file and playing it from the Melody channel using a silent style.
Guitar: MIDI channels 11 to 16 are assigned to the guitar strings 1 to 6. Correct guitar tablature replaces the bass clef, the notation will be up an octave, and guitar channel assignments are saved with MIDI files.
Piano: In this mode, channels 8 and 9 are treated as the left and right hand of a piano part.
Selecting any one of Bass, Ukulele, Mandolin, Banjo (5-string), or Violin will display the correct tablature in the Notation window and the correct fretboard in the Guitar window.
Set the track to match any of the 11 alternate guitar tunings, such as DADGAD, Open G, or Double Drop D, supported by Band-in-a-Box. Then you will see the correct notes on the guitar fretboard, in the notation and tablature.
If the track has drums that use GM Drum notes, you can select Drums to see drum notation.
Triplet Resolution (Swing): Band-in-a-Box automatically sets the resolution whenever a style is loaded. When a style has a triplet feel (such as Jazz Swing or a Shuffle style), Band-in-a-Box selects Triplet Resolution. This ensures that Jazz eighth notes (swing triplets) are handled correctly. When a style with a straight feel loads (Pop, Latin) the Triplet Resolution setting is automatically turned off. Then the notation shows even eighth notes, not triplets, and each note and duration is rounded to the nearest sixteenth note when displaying the music.
Show Bar/Beat Lines: This setting is for the Staff Roll mode only. When turned off (unchecked) only the staff lines will show, helpful for editing note Duration and Velocity lines.
Show Note Durations: A Staff Roll mode setting to show or hide the horizontal Duration lines.
Duration Line Color (Green /Blue): There are two color choices for the Duration lines, green or blue.
[Update]: This button applies the changes made in this dialog. Pressing [OK] will have the same effect.
Snap to grid lines: If this is checked, the inserted note will be lined up with the closest grid line. This is similar to the way a graphics or typesetting program aligns elements accurately on a page. This means that you don’t have to click exactly on the beat to have the note inserted precisely on the beat.
Scroll Ahead: The Notation window can be set to scroll 1 or 2 bars ahead of the music without interfering with your view of the current notation. To enable this feature, select the number of bars (1 or 2) you wish to scroll-ahead. Select zero bars to disable this feature. When the notation scroll-ahead feature is enabled, the lyrics will also scroll ahead.
Highlight playback notes in Red: Good sight-readers who like to read ahead can use this option to disable the highlighting of notes in red as the song is playing so it won’t be distracting.
Note Colors:
Notation can display notes in different colors based on absolute note names or relative to chord or key. Colors are definable; the default color scheme is one that was introduced by the Russian composer Alexander Scriabin (1872-1915). Colored notes will appear in color for printout on color printers or when saved in a color graphics file. Pressing the [Edit] button launches the Note Color Editor dialog. Change the colors by clicking on the color above the note name. Pressing the [OK-Save] button will close the dialog and save the file as C:\bb\Data\default.NCL. You can also save/load different NCL files for different color sets.
Note Names: There is an option to display note names in the center of the note head. You can display absolute note names (A, Bb etc.) or you can display numbers relative to the key or the current chord. This is helpful for learning to read music. Combined with the ability to display large font sizes, this achieves the big note look common to “EZ-2-Play” music books. Channel numbers can also be displayed on the notation. When editing notes, it is often helpful to see the channel number of each note. By setting Note Names to “Channel Numbers” you will see the channel number for each note written into the note head of the notes. This is useful when viewing an entire MIDI file that you’ve loaded onto the Melody track, and want to examine the channel information, or for editing a guitar track that uses channels 11 to 16.
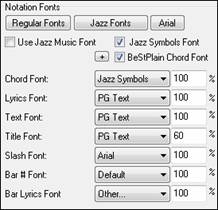
Notation Fonts: You can use the PG Music fonts or Jazz fonts for your chords and notation. Or you can choose Arial or any other font on your system for chords, lyrics, text, and titles. The Jazz fonts have the “handwritten manuscript” look. It’s a great alternative to music fonts that look too “computerized.”

|
To select just the Jazz music font, enable the Use Jazz Music Font option, then choose your Chord, Lyrics, Text, and Title fonts. Click [Regular Fonts] for a quick overall change to regular fonts in the Notation window. The [Jazz Fonts] button installs a pre-selected group of Jazz fonts. The [Arial] button installs the regular notation font and Arial for everything else. Check Use Jazz Music Font to use the Jazz font, and check Jazz Symbols Font to use shorthand Jazz chord symbols in the notation. |
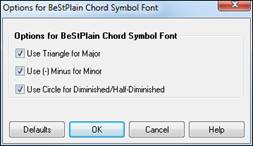
BeStPlain Chord Font is a very clear and readable font. The [+] button beside this checkbox will open the dialog with options to use triangle for major, minus sign for minor, and half or full circle for half or full diminished chords.
The Lyrics Font and Text Font appear in the Notation window, the Lead Sheet, and the printout.
The Title Font is used for the Titles, Composer, and Styles names that appear on the Lead Sheet window and printout.
The Slash Font is used for slashes / / / / which appear in the empty bars.
The Bar # Font” is used for bar numbers.
The Bar Lyrics Font is used for bar-based lyrics.
Bars/Screen: This option lets you to choose the number of bars per line for both the on-screen notation display and printing.
Guitar Chord Diagrams: These are available on the Notation, Lead Sheet, or printout for Folk, Pop, and Jazz voicings. There is an option to show the fret numbers on the diagrams.
Tab: When this is enabled, the Guitar and Bass tracks show tablature notation.
Show fret #s on chord diagrams: This will display the fret numbers for each string on the guitar chord diagrams.
Load notation layout w/songs: When this box is checked, your Notation Option settings will be saved with the song and restored the next time you load the song.
Show Key Signature: If turned off, you won’t have the key signature displayed on the Notation window. This will save some space on the screen.
Transpose Options: These preset transpose settings for non-concert instruments like brass and woodwinds will auto-select the correct transpose settings and clef split points for the instrument. For example, Trumpet +2 will write the music up 2 semitones, and the split point will be adjusted to display the music in treble clef. Guitar and bass settings are also included. If the Chord Sheet or Notation window transpose setting is in effect, a yellow hint message opens on boot up as a reminder.
Transpose: The Transpose setting lets you manually adjust the Notation window to display notes either higher or lower than their actual pitches.
Clefs split at: This setting determines the split point for placing notes on the Bass or Treble clef. The default setting is C5, displayed as C5* to indicate it is middle C. Use a higher split point, such as C6, if you want notes up to a B above middle C written on the bass clef with ledger lines.
Max Ledger Lines: You can specify an upper limit of a note range so that high notes won’t result in an excessive number of ledger lines. The default is 6, which would show a maximum of 6 ledger lines above the treble clef staff.
Show Velocity Lines: This is a Staff Roll mode setting to show or hide the vertical Velocity lines. Line color is determined by the Duration Line Color setting.
Use chord scale for enharmonics:
The sharps and flats in Band-in-a-Box notation are context sensitive to the chord names. For example, if you are in the key of Eb, and the chord is E7, a G# note will show up as G#, and not Ab. This means that the notation accidentals will automatically show up correctly.
 Enharmonics for chord tones are automatically based on the chord.
 Enharmonics for passing tones are based on chords if “Use Chord Scale Enharmonics” is set to true.
For example, on an F#7 chord in the key of Eb, the Ab note is part of the F#7 scale (as a G#, the 2nd of the scale), but is also part of the Eb key of the song. If you want to display based on the chord scale, setting “Use chord scale enharmonics” will display the note as a G# instead of an Ab.
Enharmonics on slash chords: A chord like Gm7b5/Db will display correctly using a Db instead of a Gm7b5/C#, since Band-in-a-Box bases it on a Gm scale.
Engraver Spacing: This is another one of the intelligent features which spaces the notation appropriately to avoid overlapping notation while accounting for space required by accidentals, rests, etc. This feature is visible only in Standard Notation mode.
Tick Offset: The Tick Offset is one of the keys to great looking notation. It accounts for playing that is before or behind the beat. The track is automatically scanned to determine the best tick offset so that you don’t have to set this yourself. This results in better looking notation. You can change/override this setting, but normally the best tick offset is set automatically. For example, to properly notate Jazz performances, it is sometimes necessary to set the tick offset to approximately -15. This effectively adjusts for a performance that has been played slightly “behind” the beat or, in Jazz terms, “very laid back.” In Editable Notation mode, notes entered with the mouse take the notation offset into account. So, if a note is clicked on the beat 1:1:0 will get entered at 1:1:7 if the notation offset is -7. This gives a more human feel to the arrangement.
Auto Set Tick Offset: When this is enabled, Band-in-a-Box will automatically determine the tick offset by analyzing the notes on the track. If you want to set the tick offset manually, disable this and enter the value in the “Tick Offset” option above.
Minimize Rests: When this is enabled, Band-in-a-Box will eliminate unnecessary rests. For example, if staccato eighth notes are displayed as sixteenth notes separated by sixteenth rests the setting will remove the rests and show the notes as eighth notes.
Detect Fine Resolution Notation: Improved auto-transcription identifies and correctly displays up to 128th notes. If for some reason you prefer to disable it, there is an option to do so. To set a beat to a certain specific resolution right mouse-click on the Time Line located at the top of the Notation window. You will then see a Beat Resolution dialog where you can set the resolution for both the Treble and Bass clefs.
New Line each: Use this setting to automatically start a new line on each chorus, on each chorus and the intro, or on each part marker. It applies to the Lead Sheet notation screen and to printing. If you want to control how many bars per line get displayed for a regular (non-fake sheet mode) display, use the Edit Settings for Current Bar (F5) dialog, and select “Chord Sheet and Notation - Start a New Line” on bars that you’d like a new line of notation. That setting, in combination with the Notation Window Options setting for “Bars/Screen,” and “New Line each” allow you to save custom settings for bars per line in non-fake sheet mode.
R/L Cursor Edits: This is used in the Keystroke Note Editing features.
Bar Number Font: Select any installed font for the bar numbers and adjust its size in a percentage range from 10% to 1000%. These settings affect the notation, lead sheet, and printout.
Display Font Size %: To select the notation font size for display, enter the Display Font Size as a percentage, either more or less than 100%. The same setting is available in the Lead Sheet window and the Print dialog.
Chord Vertical Position:
This controls how high the chords will be written above the staff. If this is set to 5, the chords will be written 5 notes above the top of the staff. If your piece contains a lot of high notes, then set the chord position to a high setting.

Lyric Position: You can adjust the height of the lyrics by setting the lyric height (smaller values like –8 are higher on the notation).
Auto-Hand split Piano track:
When this is enabled, the Piano track (not any other track) will be displayed on both clefs with intelligent hand-splitting. You can print out the Piano track with the hands separated. You can also manually split a piano part on the Melody or Soloist track using the intelligent hand-splitting routines. The left/right hands display in red/blue on the big piano, and on the bass/treble clefs on the notation. For example, if you have a MIDI file that is a solo piano piece, File | Open Special | Open MIDI file will put the music on the Melody track. Then choose Melody | Edit Melody Track | Piano Hand Split. Make sure that Melody | Track Type is set to “Piano.” You will then see the piano part split into 2 hands intelligently.
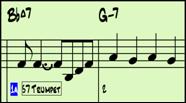
Display Patch Names on Notation:
When this is enabled, the patch name for the track is displayed on the notation, lead sheet, and printout.
Show Slashes (/) for blank bars: If this is enabled, then slash marks / / / / will show for empty bars.

Restate Chords: If this is set to “Don’t Restate,” then the program works as in previous versions, and if the chord stays the same, it will never be stated again in the arrangement until it does change. If set to “Every Bar,” “Every Line” or “Every Page,” then the Notation, Lead Sheet and Printout will restate the chord every bar, line or page. The setting of “Every Page” is the default, which means that the first bar of the Lead Sheet window will always have a chord as will the top of each Notation window.
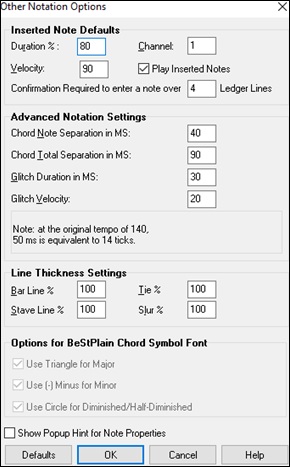
The [More..] button opens the Other Notation Options dialog.
|
|
Inserted Note Defaults: These settings determine the default values for notes that you enter manually. Duration %: Notes are not always played for their full duration. If a whole note is inserted with a duration of 80%, the note would play for 80% of eats = 3.2 beats. Velocity: The loudest possible note has a velocity of 127; a velocity of 0 is silent. Channel: Assign the MIDI channel of the inserted notes. Play Inserted Notes: When checked, notes that you insert will sound briefly as they are inserted. This lets you hear that the note you inserted sounds correct. Confirmation Required to enter a note over X Ledger Lines: To prevent accidental entry of very high/low notes, this means that a confirmation dialog would be needed to enter notes with more than X ledger lines. Advanced Notation Settings: These advanced settings give you control over the clean notation feature. Chord Note Separation in MS and Chord Total Separation in MS: This lets you set the width of chords. Band-in-a-Box will display a new group of notes on the notation for every chord. If you know that a track is single notes and therefore couldn’t have any chords, set the chord note separation to a small value like 10ms and then every note will be displayed on a new note stem. The chord width parameter is also used for the “chord step advance” feature. |
Glitch Duration in MS and Glitch Velocity: When set properly, “Glitches” will not be shown on the notation. Any note less than a certain length of time or less than a certain velocity can be filtered out.
Line Thickness Settings: These settings allow you to control the thickness of various line elements of the notation. For example, if you set the Bar Line width to 200%, the bar lines will be twice as wide, and easier to see. This affects display and printout.
Options for BeStPlain Chord Symbol Font: With these options, you can see a triangle for major, a minus sign for minor, and a half or full circle for half or full diminished chords when you use the BeStPlain chord font.
Show Popup Hint for Note Properties: If this is checked, the note properties pop-up will open if you hover the mouse cursor over a note in the Editable Notation window.
Lead Sheet Window
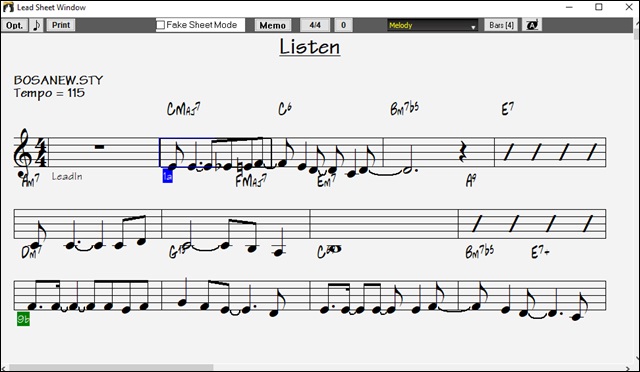
The Lead Sheet window displays a full screen of notation with one or more parts. Other options include a selectable number of staffs per page, clefs to show, font size, margin, scroll-ahead notation, guitar chord diagrams, and lyrics. If you like to sight-read along with Band-in-a-Box, this is the window for you.
The Lead Sheet window can be resized. As you resize the window, all of its elements resize in proportion.
|
Launch the Lead Sheet window from the main screen by pressing the [Lead Sheet] button (or Alt+W keys), or with the Window | Lead Sheet Window menu option. This button is also available from the Standard Notation window. |
![]() You can easily change the bars per line by pressing this button. (Note: This feature works in the Fake Sheet mode.)
You can easily change the bars per line by pressing this button. (Note: This feature works in the Fake Sheet mode.)
![]() This button will display notation with larger font size and note names within note heads. Press the button again to return to the normal size.
This button will display notation with larger font size and note names within note heads. Press the button again to return to the normal size.
As the notation scrolls ahead, you can read ahead without waiting for a page turn. During playback, red rectangles highlight the current bar. If the bar is empty (or in Fake Sheet mode), the Lead Sheet will draw the staff lines and bar lines in red.

The Lead Sheet is also useful as a kind of “Print Preview” feature, as it offers you the ability to correlate the on-screen notation to a printout.
You can move around the Lead Sheet window in various ways. Cursor keys and mouse clicks will move a small blue rectangle around the screen, which lets you type in chords at that location. Double-clicking the mouse at any bar will start playback from that position.
Selecting Tracks in the Lead Sheet
![]() Click on the track selector button and select a track from the menu to view notation of that track.
Click on the track selector button and select a track from the menu to view notation of that track.
![]() To view multiple tracks, first select the track that you want to show at the top, and then click on the [+] button and select the tracks in the order that they should appear from top to bottom. To remove an extra track from the display, click on that track name and select remove from the menu. To remove all extra tracks, click on the [+] button and select remove extras from the menu.
To view multiple tracks, first select the track that you want to show at the top, and then click on the [+] button and select the tracks in the order that they should appear from top to bottom. To remove an extra track from the display, click on that track name and select remove from the menu. To remove all extra tracks, click on the [+] button and select remove extras from the menu.
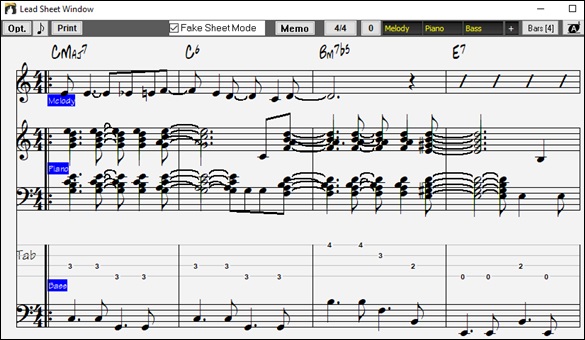
![]() There is an option in the Lead Sheet Options dialog to allow you to display the chords above each track, or just the top track of the notation. If you press [Print] from the Lead Sheet window you will be able to print out the multiple tracks of notation.
There is an option in the Lead Sheet Options dialog to allow you to display the chords above each track, or just the top track of the notation. If you press [Print] from the Lead Sheet window you will be able to print out the multiple tracks of notation.
Fake Sheet Mode
The Lead Sheet window has its own Fake Sheet Mode checkbox. When it is NOT selected, the Lead Sheet will work as it always has (in linear mode).
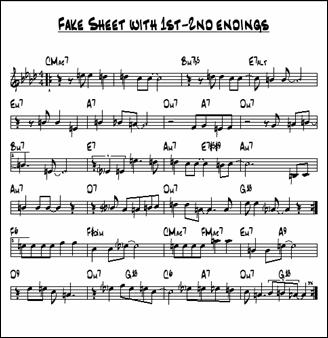
![]() When Fake Sheet Mode is selected, the form will show like a lead sheet, with only one chorus showing, and 1st/2nd endings and repeats displayed.
When Fake Sheet Mode is selected, the form will show like a lead sheet, with only one chorus showing, and 1st/2nd endings and repeats displayed.
The Fake Sheet can show multiple lines of lyrics for 1st and 2nd endings or several verses stacked in multiple lines.
Lines of Lyrics on Fake Sheet
If your song has 1st and 2nd endings or multiple verses of lyrics, multi-line lyrics can be displayed, so you will see all verses on the same fake sheet.
Load in the song C:\bb\Documentation\Tutorials\Tutorial - BB2005\Listen Multi-line lyrics Demo.MGU.
![]()
![]() Open the Lead Sheet and select “Fake Sheet Mode.”
Open the Lead Sheet and select “Fake Sheet Mode.”
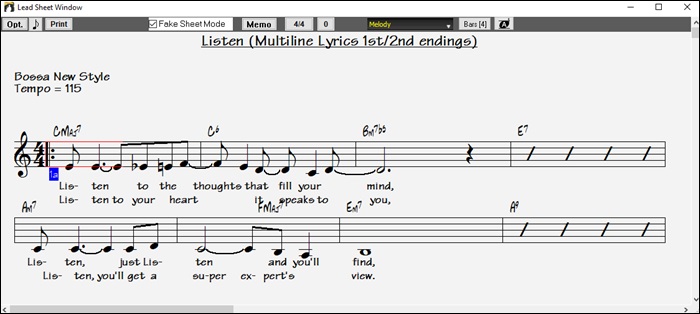
This song has a 1st/2nd ending entered, with separate lyrics for each ending. le lines of lyrics will also appear if there are lyrics in le verses (choruses).
![]() In the Notation Window Options, “Lyric Position” allows you to vertically position the height of the lyrics.
In the Notation Window Options, “Lyric Position” allows you to vertically position the height of the lyrics.
Harmony Notation Display
Harmonies can be displayed on the Lead Sheet window (or printed) with separate notation tracks for each harmony voice. View each harmony on a separate track, or view/print a single harmony voice. To examine the harmony display features, load in the song “Night_T.MGU.” The melody of this song was previously converted to a harmony using the Melody | Edit | Convert Melody to Harmony option, so this song contains a harmony on the Melody part.
Open the Notation window (Ctrl+W) and you will see all four voices of the harmony on the same treble clef. |

|
Now open the Lead Sheet window. Band-in-a-Box now recognizes that this is a harmony (generated by Band-in-a-Box) and displays each voice on a separate track of the lead sheet. |
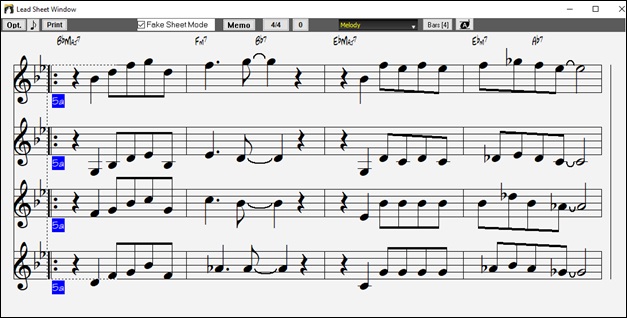
![]() Press the [Print] button to print out “Voice 2.” If needed, press the notation “Transpose Options” to first visually transpose the instrument to Eb for an “Alto Sax” chart.
Press the [Print] button to print out “Voice 2.” If needed, press the notation “Transpose Options” to first visually transpose the instrument to Eb for an “Alto Sax” chart.
Multi-Channel Notation (Sequencer Mode)
Normally you would want a single part on the Melody and Soloist tracks. But, since MIDI information can have separate channels, it is possible to store 16 separate parts on each of the Melody and Soloist tracks. When one of these tracks has been set to “Multi(16)-Channel” we refer to this as sequencer mode.
Now, when you are in this multi-channel mode, output from the Melody/Soloist track will be on whatever MIDI channel the information is stored on, and will not be using the Melody/Soloist MIDI channel.
|
When you open the Lead Sheet window, you will see the entire MIDI file displayed on separate tracks of notation. This is likely “too much information” to read, unless you are a symphony conductor. |
![]() To customize the notation display for sequencer mode, press the [Opt.] button on the Lead Sheet toolbar.
To customize the notation display for sequencer mode, press the [Opt.] button on the Lead Sheet toolbar.
 |
Note: These settings are only visible when the track type for the Melody or Soloist is set to Multi (16) – Channel. |
Select “CUSTOM channels play/display” and press the [Set…] button to launch the Sequencer Window (Multi-channel track on Melody/Soloist) dialog. Then you can customize which channels will play and display.
|
This dialog can also be opened by clicking on the [SEQ] toolbar button on the main screen. |
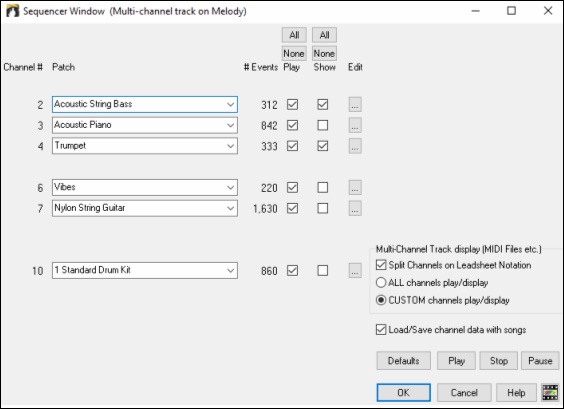
In the example picture, we have set Channel 2 (Bass) and Channel 4 (Trumpet) to show on the notation and have set all of the channels to play (to hear them).
![]()
For a specific channel, (e.g. channel 3: piano), we see the following information.
Channel 3: Acoustic Piano (this is the patch name found on the track).
842: There are 842 events in the track; usually every note is an event.
We have customized the piano track so that it can be heard (play=true), but not seen in notation (Show=false).
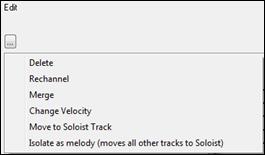 |
There is a small button at the right of the track line that allows you to delete, rechannel or merge the channel with another channel.
You can also change the patch (instrument) for that track by using the instrument patch combo box. |
Now that we’ve customized the display, we are seeing bass and trumpet on the notation, and hearing the entire track.
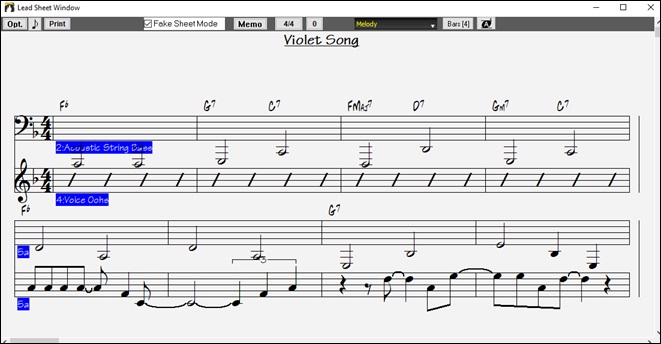
|
Select “CUSTOM channels play/display” and click on the [Set] button to launch the Sequencer (Multi-channel track on Melody/Soloist) dialog where you can customize which channels will play and display. |
Lead Sheet Options Dialog
![]() Pressing the [Opt.] button in the Lead Sheet window or the [Leadsheet] button in the Preferences dialog launches the Lead Sheet Options dialog.
Pressing the [Opt.] button in the Lead Sheet window or the [Leadsheet] button in the Preferences dialog launches the Lead Sheet Options dialog.
The settings in this dialog are applicable to the Lead Sheet window only. If you want to set options that are shared by the Lead Sheet window and the Notation window, press the [Notation Options…] button.
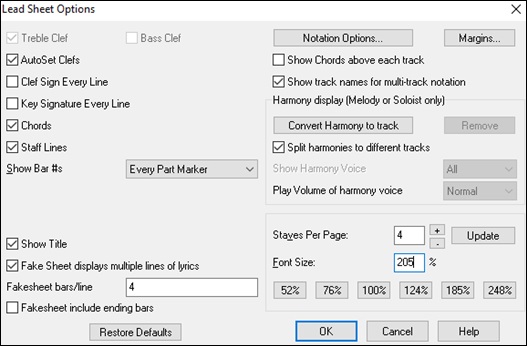
Treble Clef / Bass Clef - These checkboxes choose which clefs will display in the Lead Sheet view.
AutoSet Clefs - When set, Band-in-a-Box will attempt to pick the clef for you automatically displaying the bass clef when you are on the bass track or any other track with low bass notes. It will show both clefs when on the piano or drum track.
Clef Sign Every Line / Key Signature Every Line - By default, the Clef and Key will be shown at the beginning of every page, but if you want one every line, you can check these options.
Band-in-a-Box have multiple keys in a song, the new key signature is shown on notation.
Chords and Staff Lines - Both are shown by default. Uncheck this box if you don’t want them to display.
Show Bar #s - Choose whether the bar numbers will be shown for each bar, only at part markers, or not at all.
Show Title - If set, the song title will be displayed along with other information like Composer Names and Style information that is set in the Print Options dialog of the Notation window. To set these options choose File | Print from the menu.
Fake Sheet displays multiple lines of lyrics shows lyrics for 1st and 2nd endings or multiple choruses stacked as le lines on the fake sheet.
Fakesheet bars/line - You can set a custom number of bars to display on each row of the fake sheet. For example, enter “4,6,4,” and the program will show 4 bars for the first row, 6 for the second, and 4 for the rest.
Fakesheet include ending bars - Fakesheets can optionally include the 2-bar song ending.
Restore Defaults - You can reset all the Lead Sheet Options back to default settings by pressing the [Restore Defaults] button.
Notation Options - To set options that are shared by the Lead Sheet window and the Notation window, press the [Notation Options…] button.
Margins
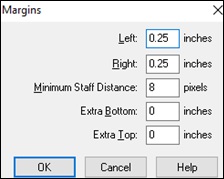 |
Set margins for the Lead Sheet window, just like the margins in a word processor. For example, if you want the lead sheet window to only take up the top part of the screen, set a bottom margin (of, say, 2 inches) and then make the lead sheet window smaller by pulling the bottom up.< /p> This feature has no effect on printout; the Print dialog has its own margin settings. |
Show Chords above each track - When using multiple tracks of Notation, this determines whether each track will show the chord names or not.
Show track names for multi-track notation - If checked, the Band-in-a-Box track names will be inserted at the start of each track in the multitrack notation display.
Harmony display
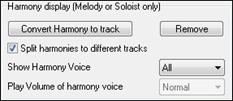
[Convert Harmony to track] will add a harmony to an existing Melody.
[Remove] will remove the harmony from the track.
Split Harmonies to different tracks enables the splitting of the harmonies to different tracks on the lead sheet.
Show Harmony Voice allows you to select ALL tracks, which will cause each track to display on a different track on the Lead Sheet. Or select a specific Voice to display only that voice. For example, if you choose “Voice 2” and press OK, you will now see just voice 2 of the harmony.
You can control the volume of the selected harmony voice relative to the other voices in the harmony. The Play Volume of harmony voice setting can be set to:
- Normal: Harmony plays as normal.
- Solo: Only the selected voice will play.
- 50% Solo: Selected voice is much louder than other voices.
- Quiet: Selected Voice is much quieter than other voices.
- Muted: Selected Voice is muted.
These settings are useful to sight-read along on harmonies and learn to hear inner voices of a harmony.
Staves Per Page - The number of staves shown in the lead sheet can be set by typing in a number or using the [+] and [-] buttons. If “Auto-Set” is selected, the number of staves will be set automatically, attempting to fit the lead sheet on a single page.
Font Size - Choose the font size with one of the preset buttons for popular sizes, or type a number between 45% and 300% in the Lead Sheet Options dialog.
Lead Sheet Memo
![]() You can enter a memo to add to the Lead Sheet printout. Click on the [Memo] button in the Lead Sheet to open the Lead Sheet Memo window. You can copy/paste from/to this memo.
You can enter a memo to add to the Lead Sheet printout. Click on the [Memo] button in the Lead Sheet to open the Lead Sheet Memo window. You can copy/paste from/to this memo.
The memo will be automatically positioned after the end of the Lead Sheet and printout. Use extra blank lines in the Lead Sheet Memo to control where it displays on the page.
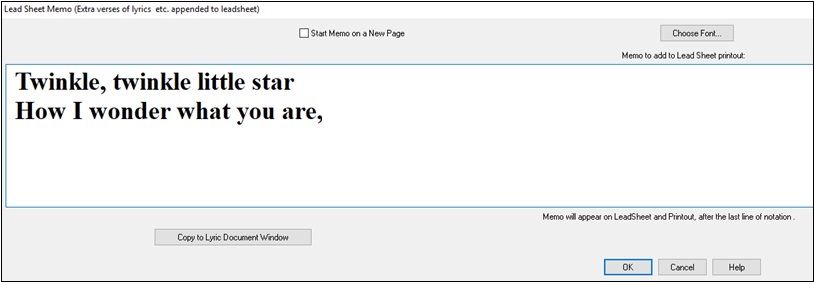
![]() There is an option to print the Lead Sheet Memo on a new page of the printout.
There is an option to print the Lead Sheet Memo on a new page of the printout.
Press the [Choose Font] button to select the font you would like for the memo.
A text block will be appended to the Lead Sheet window and printout. This could be song lyrics that you want appended to the end, multiple verses of lyrics, or any other text.
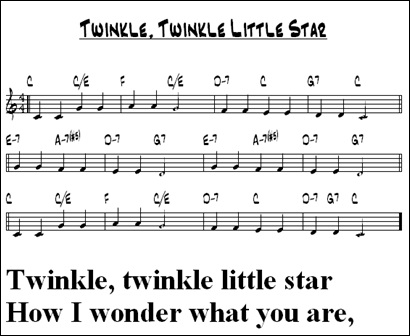
Lyrics
Band-in-a-Box supports lyrics in three different ways: Note-based lyrics, Bar-based lyrics, and a Big Lyrics (Karaoke) window. Note-based lyrics can be entered on the Notation window, and bar-based lyrics can be entered either on the Chord Sheet or on the Notation window.
In the previous versions, there were line-based lyrics, which could be entered for each line on the Notation window. You can longer enter this type of lyrics, but if your existing song has line-based lyrics, Band-in-a-Box can convert them to bar-based lyrics. In the Global Song Overrides dialog, there is an option which allows you to choose how the conversion should occur when the song with line-based lyrics opens.
 |
|
The default is “Always (auto-split),” which will convert line-based lyrics to bar-based lyrics and splitting them into 4 bars. If you choose “Always (don’t split),” line-based lyrics will be converted but they won’t be split into 4 bars. You can also choose not to convert line-based lyrics automatically. If the current song has line-based lyrics, you can press the [Convert now] button to convert them to bar-based lyrics. |
Bar-based Lyrics
To see the bar-based lyrics that you have entered on the Chord Sheet, click on the [Chord Display] toolbar button and check Bar Lyrics.
![]()


Note-based Lyrics
Note-based lyrics offer accurate placement of lyrics by placing a word under each note.

![]() You can enter note-based lyrics by pressing Ctrl+L keys or pressing the [L] button on the Notation toolbar to open the Lyric Edit window.
You can enter note-based lyrics by pressing Ctrl+L keys or pressing the [L] button on the Notation toolbar to open the Lyric Edit window.
Lyric Edit Window
![]()
The [Line] button enters a forward slash “/” line break marker in the current lyric.
The [Para] button enters a backslash “\” paragraph break marker in the current lyric.
The [Enter] button enters the current lyric, equivalent to hitting Enter key or Tab key.
The [Close] button closes the Lyrics Edit mode, equivalent to hitting the [L] button again.
The [Sec Text] button enters the text in the lyric box as section text at the current bar.
The [Edit] button opens the Edit Lyrics dialog where lyrics and section text can be edited.
As you enter the lyrics, the note is highlighted. Pressing the Tab or Enter key moves to the next note. You can “undo” lyrics with the Edit | Undo command.
When you are finished a line of lyrics, hit the [Line] button. This enters a backslash “\” line break marker in the current lyric.
Note-based lyrics are saved with the MIDI file, so you can use them in your other MIDI programs.
![]() Vertical placement is set in the Notation Window Options dialog. A setting of -10 puts the lyrics directly under the treble clef, higher values put them lower.
Vertical placement is set in the Notation Window Options dialog. A setting of -10 puts the lyrics directly under the treble clef, higher values put them lower.
Lyrics Event List
You can edit the lyrics using an event list as well. This allows you to enter lyrics at any point, not just tied to a note.
![]() Press the [#] button on the Notation window toolbar.
Press the [#] button on the Notation window toolbar.
![]() Then, press the [Edit Lyrics] button. You can then see the Edit Lyrics dialog.
Then, press the [Edit Lyrics] button. You can then see the Edit Lyrics dialog.

From here, you can edit lyrics, insert new lyrics, append lyrics to the end of the track, or delete lyrics. A single lyric event can be 128 characters.
The Lyrics Menu
The complete list of Lyrics functions is found in the Edit | Lyrics submenu.
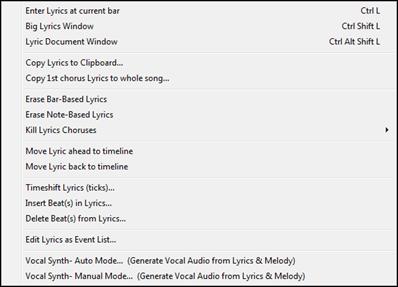
Enter Lyrics at current bar: Opens the Lyric entry box at the current location of the time line or highlight cell.
Big Lyrics Window: Opens the Big Lyrics window for viewing lyrics and, optionally, chord symbols.
Lyric Document Window: Displays a full screen of formatted lyrics. Easily copy and paste lyrics to and from your favorite word processor.
Copy Lyrics to Clipboard: This function allows you to copy a song’s lyrics (and/or the chords) to the Standard Windows® clipboard. By pasting this data into a word processor, you can print out the lyrics in the font of your choice. The dialog has options to allow copying of note-based and/or line-based lyrics. With either option you can choose to include the chord symbols, have double or single line spacing, and make margin settings.
Copy 1st chorus Lyrics to whole song: Copies the note-based lyrics for the first chorus to the rest of the song.
Erase Bar-Based Lyrics: Erases the bar-based lyrics from the song.
Erase Note-Based Lyrics: Erases the note-based lyrics from the song.
Kill Lyrics Choruses: Select to kill lyrics in the First Chorus, Middle Choruses, or Last Chorus from a list box.
Move Lyric ahead to time line / Move Lyric back to time line: If you have a note-based lyric that you want to time shift ahead or back, you can click on the time line at the destination that you want, and then choose this item. You can also shift lyric times using the Lyric Event list.
Timeshift Lyrics (ticks) / Insert Beat(s) in Lyrics / Delete Beat(s) from Lyrics: These are functions that apply to the entire lyric track. They are useful when you’re inserting bars or beats into the song and need to move the lyrics around to keep them in sync.
Edit Lyrics as Event List: Opens the Edit Lyrics dialog with Edit, Insert, Append, and Delete functions.
Vocal Synth - Auto Mode / Manual Mode: This will generate a vocal track using an online third party vocal synthesizer called Sinsy for a MIDI melody track with lyrics.
Lyric Document Window

The Lyric Document window displays a full screen of fully formatted lyrics so you can easily copy and paste lyrics to and from your favorite word processor. If you have the lyrics available, you can quickly paste them into Band-in-a-Box.
You may already have the lyrics to your song typed into a word processor, nicely formatted with font/color/bold choices etc. Previously, you would need to retype them into
Band-in-a-Box and would lose your formatting. Now you can simply Copy/Paste them to/from your word processor. This allows you to quickly add lyrics to any Band-in-a-Box song.
You can open this window by choosing Window | Lyric Document Window, or pressing Ctrl+Alt+Shift+L. In addition, if “Auto-open lyrics window for songs with lyrics” is set to true in the Lyric Window Options dialog (Options | Preferences [Big Lyrics]), the Lyric Document Window will open automatically when the song is loaded, and close when the next song is loaded.
To use the window, type or paste in text from a word processor. You can select fonts and colors as you would in a word processor. Since the data is stored in RTF format, it should look very similar to the appearance it would have in WordPad.
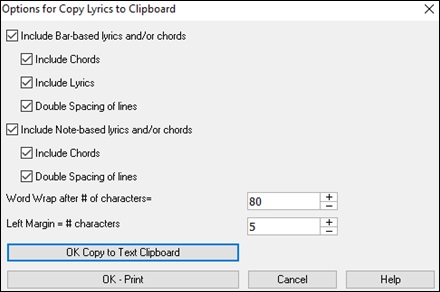
![]() You can transfer “line based” or “note based” lyrics from the Notation Screen of Band-in-a-Box to the Lyric Document window. Press the Copy Lyrics button to do this. This launches the Options for Copy Lyrics to Clipboard dialog allowing you to select which elements to copy (line lyrics/ note-based lyrics/ chords) and formatting options. Then click on [OK Copy to Text Clipboard]. A message will tell you that the lyrics have been copied to the clipboard. Click on [OK] to paste the lyrics into the Lyrics Document Window.
You can transfer “line based” or “note based” lyrics from the Notation Screen of Band-in-a-Box to the Lyric Document window. Press the Copy Lyrics button to do this. This launches the Options for Copy Lyrics to Clipboard dialog allowing you to select which elements to copy (line lyrics/ note-based lyrics/ chords) and formatting options. Then click on [OK Copy to Text Clipboard]. A message will tell you that the lyrics have been copied to the clipboard. Click on [OK] to paste the lyrics into the Lyrics Document Window.
![]() You can also print directly from this window and copy to/from the Song Memo (using copy/paste).
You can also print directly from this window and copy to/from the Song Memo (using copy/paste).
Big Lyrics Window
The Big Lyrics Window is great for sing-along or karaoke. It opens from the Edit | Lyrics or Windows| Lyrics submenu, with the keystrokes Ctrl+Shift+L, or with the [L] toolbar button.

Each word is highlighted as it plays, and the window can be customized by clicking on the [Options] button. Click on any word in the Big Lyrics Window to start the song playing from that point.
Lyric Window Options
|
Add chord symbols, customize your color scheme, choose a favorite font, and select a size in the Lyric Window Options dialog. |
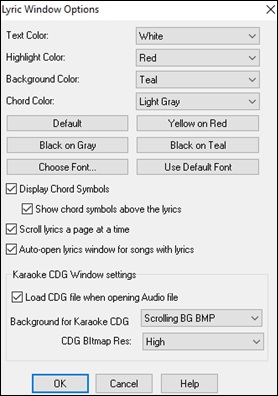
Individual color elements can be picked or you can choose one of the presets.
Display Chord Symbols will interleave the chord symbols with the lyrics.
Show chord symbols above the lyrics will show the chords on a separate line.

With the Scroll lyrics a page at a time option selected the Big Lyrics scroll a page at a time. When the lyric cursor reaches the next-to-last line of the lyrics it will scroll to the top of the page, allowing uninterrupted reading of lyrics.
Auto-open lyrics window for songs with lyrics automatically opens the Big Lyrics window when a song with lyrics is opened in Band-in-a-Box.The popular Karaoke file format (.KAR) can be opened directly into Band-in-a-Box just like MIDI files. Chord symbols are displayed (Band-in-a-Box intelligently analyzes the chords of the song), as well as the lyrics from the Karaoke files.
Karaoke MP3/CDG Files
Audio Karaoke files are popular using several formats. The most common is CDG format, which includes the lyrics in graphic format on audio CDs. Since the computer user doesn’t always use audio CDs, there is a format that combines MP3 (containing the music) and CDG (the graphical lyrics). You can open MP3/CDG files inside Band-in-a-Box and see the scrolling lyrics from your Karaoke files. If you want to play along on your own instrument, you can use the Audio Chord Wizard to figure out the chords and display them in its Chord window.
|
To open a Karaoke File, use File | Open, and find a WAV, MP3, or WMA file that has a same named CDG file in the same folder. Then the Karaoke window will open and display the lyrics. |
The Big Lyrics Window has some options for the Karaoke window.
|
You can choose to have a background to the window, either a moving one or fixed picture. These pictures are in the C:\bb\Data\KaraokeBMP folder, and you can add your own BMP or JPG image to that folder. |
|
The [Print] button opens the Options for Copy Lyrics to Clipboard dialog. This function allows you to copy a song’s lyrics (and/or the chords) to the standard Windows® clipboard. |
|
By pasting this data into a word processor, you can print out the lyrics in the font of your choice. The dialog has options to allow note-based and/or bar-based lyrics to be copied to the clipboard. With either option, you can choose to include the chord symbols, have double or single line spacing, and make margin settings. |
|
The [Vocal Synth] button offers Auto and Manual modes for sending the Melody track and lyrics to the 3rd party Sinsy vocal synthesizer. A synthesized vocal track will be generated and imported into the Band-in-a-Box Audio track. |
Printing
Band-in-a-Box prints Lead Sheet style notation with chords, melodies, lyrics, and text notes. It will also print instrument parts from your Band-in-a-Box arrangements, either individual instruments or multiple parts. Most songs will fit on one page, so your printout will look similar to a standard fake book.
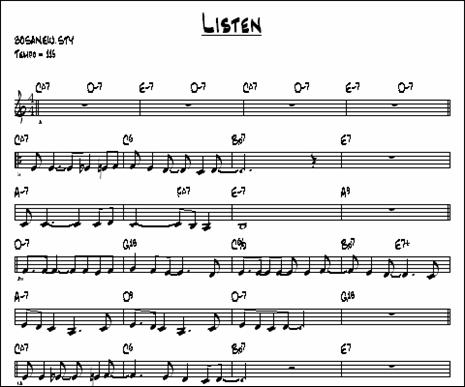
You can easily make and print out a custom fake book of all of your tunes. Instantly transpose and print parts for brass or reed instruments. Print options include title, bar numbers, composer, style, and copyright information.
Print Options
|
Pressing the printer button launches the Print Options dialog. Print options include title, bar numbers, composer, style, and copyright. |
![]() This dialog also opens by clicking on the [Print] button in the Notation, Lead Sheet, or Preview windows.
This dialog also opens by clicking on the [Print] button in the Notation, Lead Sheet, or Preview windows.
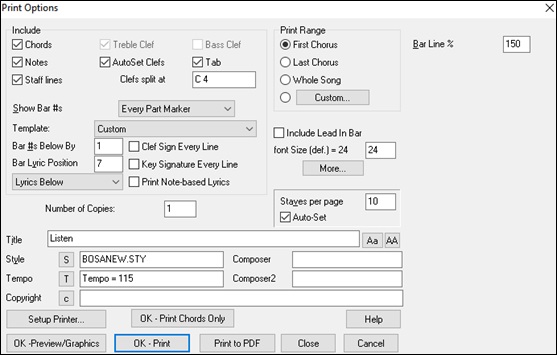
Chords: If selected, this will include the chords of the song on the lead sheet. Remember that you can set the height that the chords will appear in a different dialog (Notation Window Options Dialog).
Notes: If you want only a chord lead sheet with no Notes, then turn this off. Otherwise, it should be ON.
Staff Lines: Set to off (uncheck) to print a “chords only” fake sheet with chord symbols and bar lines but no staff lines or notation.
Treble Clef: Normally you will want to include the treble clef unless you’re printing a bass track or left hand piano part alone and want to save space.
Bass Clef: For melodies or solos, you probably won’t want the bass clef printed. For other parts (piano, bass, drums, etc.) you should set this option to YES.
AutoSet Clefs: With this setting, the program will print only the clefs that are necessary. For example, a Melody would probably print with just the treble clef, while a bass track would use only the bass clef, and a piano track would use both clefs.
Tab: This enables tablature display and printout for guitar and bass tracks.
Clef Split At: This determines where the notation will split the treble and bass clefs. Middle C is normally considered to be C5, and C4 is one octave below. For the Melody or Soloist track, you will probably want the entire track to be printed on the treble clef, so you could choose to split the clefs at C4.
Show Bar #s: There are options to include the bar # on the printout (e.g., every bar, every part marker, every row, every page).
Template: There are print templates in the print dialog to achieve various printout styles - Normal/Lyrics Only/Chords and Lyrics/Chords Only/Blank Paper. In the Print dialog, select the desired print template. To return to default settings choose the “Normal” template.
Bar #s Below By: This sets the vertical position of the bar numbers in the printout between 1 and 7. 1 is closest to the staff and 7 is farthest from the staff (lowest).
Bar Lyric Position: This allows you to adjust the vertical position of the bar lyrics.
Lyrics: Bar lyrics can be printed above the chords, below the staff, separately at the end (on a separate page), or not printed at all. Normally lyrics are printed below the staff.
Clef Sign Every Line: Leave this unchecked if it’s not needed and you want an uncluttered look.
Key Signature Every Line: Most modern fake books don’t include the key signature every line. If you would like to see a key signature at every line, set this to “Yes.”
Print Note-based Lyrics: Set to “Yes” to print the Melody track with Lyrics, or turn off to print just the music for the melody line.
Print Range (First Chorus/Last Chorus/Whole Song): You can print the First chorus, the Last chorus, or the whole song. When you change this setting, Band-in-a-Box will reset the number of staves per page setting in order to auto-fit the printout to one page, if possible.
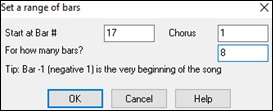
Custom:
A specific range of bars can be printed, by either highlighting a region or entering a range of bars. To print out, for example, bars 11 to 16 of a song, press the [Custom] button, and enter the range bar 11 for 5 bars. The song will then print only that range of 5 bars.
Include Lead-In: If your song has a lead-in (pickup) to bar 1 then make sure you’ve checked the Lead-In. Actually, Band-in-a-Box sets this for you by looking for notes in the lead-in measure. You can override this automatic setting, if necessary.
Font Size: This is the font size for the printed music. Changes will be seen in the Print Preview.
Staves per page: Band-in-a-Box will automatically auto-fit on 1 page, use this to override the auto setting. Remember that the title takes up 1stave. The “Auto-Set” option will set the number automatically and will try to fit the lead sheet on a single page.
Bar Line %: This allows you to set the bar line thickness.
More (Margins & Misc. Settings)
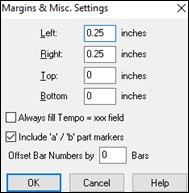
Click the [More] button to set margins.
|
You can also select the “Always fill tempo” option, which automatically writes the current tempo on the song sheet. On print out, if “Include “a” / “b” part markers” is set bar numbers will include “a” or “b” after them (the name of the substyle). Use “Offset Bar Numbers by” to offset the display of bar numbers on the printout or lead sheet. For example, if you want bar 1 to display as bar 17, enter an offset of 16. |
Title/Style/Tempo/Composer/Copyright: Enter this information in the fields provided. If the title is long the font size will be reduced, and the title won’t be underlined. Titles are limited to 60 characters.
- Press the [A] button to print the title in upper case.
- The [T] button automatically inserts the current tempo setting for the song.
- The [©] button will insert the copyright symbol into the copyright field.
- The [S] button will enter the full style name into the Style field.
[Setup Printer]: This launches the setup dialog for your printer. If you choose a new printer, Band-in-a-Box will automatically set this as your default printer.
Click on the [Setup Printer…] button to open the printer properties to set paper size, resolution, page orientation and other settings controlled by the printer driver.
[OK - Print Chords Only]: This button lets you quickly print a “chords only” fake sheet.
[Print to PDF]: You can save your printouts directly as a PDF file. From the Print dialog, press [Print to PDF]. This opens a Save As dialog for the Pdf995 printer driver. Choose a location for your file and assign a name to the PDF, then press [Save] to create a fully portable file that you can view, print, post, or upload.
Print Preview
![]() This feature allows you to preview what the printed pages will look like by displaying them on-screen.
This feature allows you to preview what the printed pages will look like by displaying them on-screen.
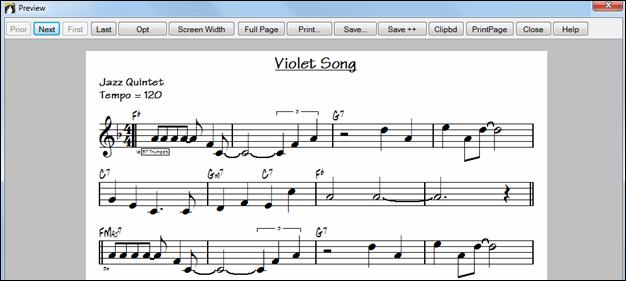
Use the [Prior], [Next], [First], and [Last] buttons to navigate additional pages.
Press the [Opt] button to open the Preview Options dialog.
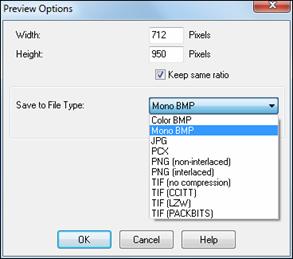
In the Preview Options dialog, you can set the exact number of pixels to display for the print preview. The same settings are also used if you choose to save the pages to a graphics file in the popular .JPG, .TIF, or .BMP file types.
Printing your song to a graphics file allows you to embed your notation in a document, or in an HTML file for use on your web site.
This feature is only limited by available memory. This allows high resolution BMP’s like 2400 x 3000. A BMP of 2400x3000 is 300 dpi for an 8”x10” image.
When saving to a JPG file there are additional quality settings.
When you have selected your file options, press the [OK] button.
You will then see a high-resolution graphic on screen, and you can save that to a BMP using the [Save…] button.
To save a JPG file, press the [Save…] button and then select “Save to File Type:” JPG.
You can then see the estimated size of the file and can change settings by pressing the Low/Medium/High resolution buttons.
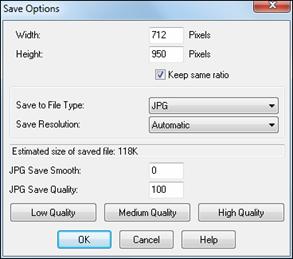
Use the [Screen Width] button to display the notation across the full width of the screen.
The [Full Page] button will shrink the notation to display a full page at a time.
The [Save…] button saves the current page as a Graphics file.
The [Save + +] button saves all of the pages to graphics files named songnamexxx.bmp, where xxx is the page number.
With the [Clipbd] button, you can quickly copy a bitmap to paste into other applications.
Press the [PrintPage] button to enter a page number and print only that page, not the complete song or a full chorus.
Chords-Only Lead Sheet Display and Printout
Need a simple fake book style chord chart? You can display just the chords in the Lead Sheet window or print out a lead sheet with just chord symbols.
![]() To print a chords-only lead sheet, disable the “Staff lines”option in the Print Options dialog.
To print a chords-only lead sheet, disable the “Staff lines”option in the Print Options dialog.
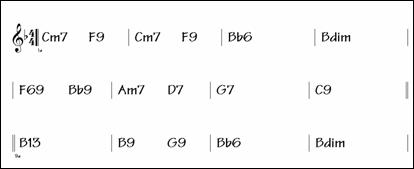
Printing Multiple Tracks
To print more than one track of notation:
 Open the Lead Sheet window.
 Select the track that you want to show at the top.
 Click on the [+] button and select the tracks in the order that they should appear from top to bottom. To remove an extra track from the display, click on that track name and select remove from the menu. To remove all extra tracks, click on the [+] button and select remove extras from the menu.
You will then see a group of tracks, displayed in the order you selected them.
![]() Press [Print] from the Lead Sheet window to print the art Band-in-a-Box notation.
Press [Print] from the Lead Sheet window to print the art Band-in-a-Box notation.
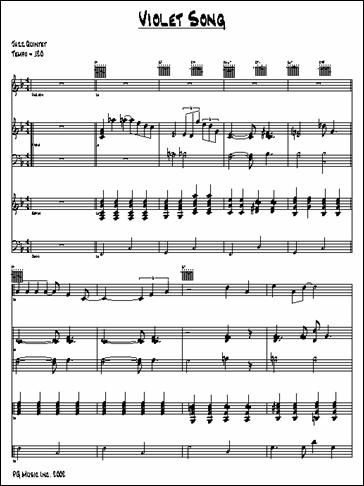
Print Multiple Songs
To print out a single song you use the [Print] button in the Notation window. If you want to print out several songs, use the Print Multiple Songs feature to print them all out at once.
This allows you to print all of the songs in a subdirectory with one command. This feature is accessed from the File | Print Multiple Songs menu item.
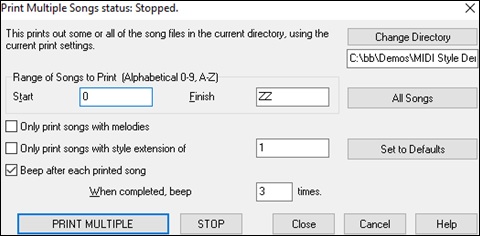
You can set options to refine which songs will get printed. For example, you might want to only print songs in a certain style (e.g. Bossa Nova), or only songs beginning with letters R to Z, or only songs with melodies.
Before you print out a whole bunch of songs, it is important to set the options that you like, as the program will use the same options for each song. Use the Print Options dialog. Perhaps you want to print out only the first chorus of each song, for example. The program will automatically set each song to print out on 1 page if possible.
First, make sure that you are in the correct directory that you want to print.
This is displayed in the [Change Directory] button.
For example, if the box under the [Change Directory] button says C:\bb, then the songs in C:\bb will be printed. If you want to print songs in a different subdirectory, then press the [Change Directory] button.
If you want to print all songs in a subdirectory, then press the [All Songs] button. Pressing this button sets the “Start” and “Finish” ranges to start at “0 “ (blank) and finish at “ZZ.”
Since song files with names like 8dayweek.mgu will appear before the letter A when sorted alphabetically, the blank string “0” is used instead of the letter A to ensure the inclusion of all songs.
Normally, you would want the Range of Songs to Print set to “All Songs,” but if you’ve already printed out songs from A to M, and want to resume printing starting at N, you can specify this range N to Z so that you don’t have to print out everything again.
If Only print songs with melodies is set, then only files that have a melody in them (i.e., song files ending in mg?) will print.
Only print songs with style extension of _ is useful if you want to only print out certain styles. For example, if you only want to printout Jazz Swing songs, then you can set this to style 1, which is Jazz Swing. Style 4 is Bossa Nova.
The 24 built-in styles each have a number associated with them. All user styles have a style character of U.
Here are the style numbers for the built-in styles.
Jazz Swing |
1 |
Heavy Rock |
D |
Country 12/8 |
2 |
Miami Sound |
E |
Country |
3 |
Milly Pop |
F |
Bossa |
4 |
Funk |
G |
Ethnic |
5 |
Jazz Waltz 3/4 |
H |
Blues Shuffle |
6 |
Rhumba |
I |
Blues Even |
7 |
Cha Cha |
J |
Waltz 3/4 |
8 |
Bouncy 12/8 |
K |
Pop Ballad |
9 |
Irish |
L |
Shuffle Rock |
A |
Pop Ballad 12/8 |
M |
Light Rock |
B |
Country12/8 |
N |
Medium Rock |
C |
Reggae |
O |
If your printer requires loading each sheet, you might want the program to beep after each printed song. The Beep after each printed song setting is useful to monitor the printout if you aren’t near your printer, because if it stops beeping, then printout has stopped, and you may be out of paper.
When completed, beep x times will notify you that the job is finished by beeping a specified number of times.
The [PRINT MULTIPLE] and [STOP] buttons start and stop printing the multiple songs.
Band-in-a-Box monitors the Print Manager to avoid overloading it with songs to print. So if the Print Manager has more than 2 songs waiting to print, Band-in-a-Box will pause before printing a new song. If your printer runs out of paper, the Windows® Print Manager and Band-in-a-Box will wait for you to put more paper in before automatically resuming printout. The status of the Printout is displayed at the top of the dialog.
Unconditional 30-Day Money Back Guarantee on all PG Music products purchased from PG Music Inc.
PG Music Inc.
29 Cadillac Ave Victoria BC Canada V8Z 1T3
Sales: 800-268-6272, 250-475-2874,+ 800-4746-8742*
* Outside USA & Canada where International Freephone service is available.
Access Codes
Tech Support: Live Chat, support@pgmusic.com
 Online now
Need Help?
Customer Sales & Support
|
Phones (Pacific Time) 1-800-268-6272 1-250-475-2874 |
||
| Live Chat | ||
| OPEN | Online Ordering 24/7 |
|
| OPEN | Forums, email, web support |


